The Pizza Dough That Takes Three Days to Make

Don’t let that scare you off.
It does take about three days to make this pizza dough. But most of that time, the dough is just hanging out in the fridge, doing its own thing.

This recipe comes from the new “A16: Food + Wine” (Ten Speed Press) cookbook by Nate Appleman, Shelley Lindgren, and Kate Leahy. Yes, it’s the new cookbook from one of my favorite San Francisco restaurants, A16, where I have swooned over many a thin-crust, Neapolitan-style pizza.
The dough comes together in a mixer, then rests and ferments in the fridge for a couple days before it’s ready to use. It couldn’t be simpler. And the result is a dough that’s a breeze to stretch and manipulate, and which culminates in a deeply flavored crust.

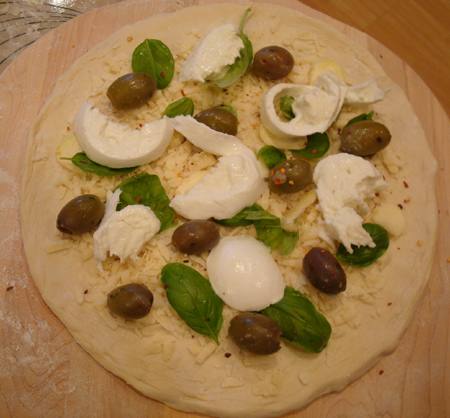
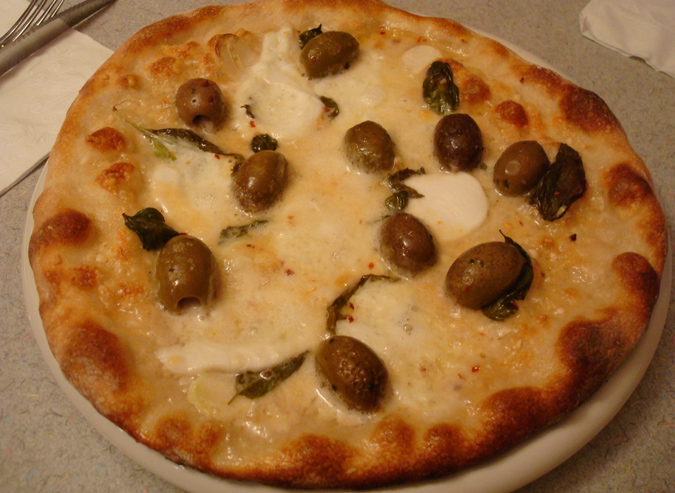
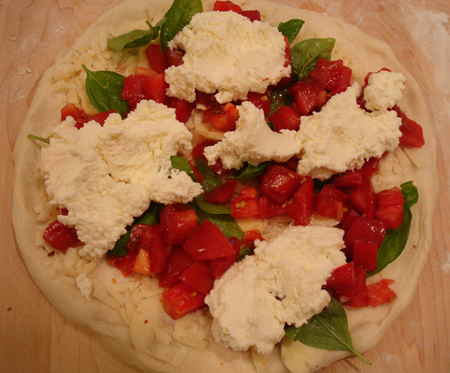
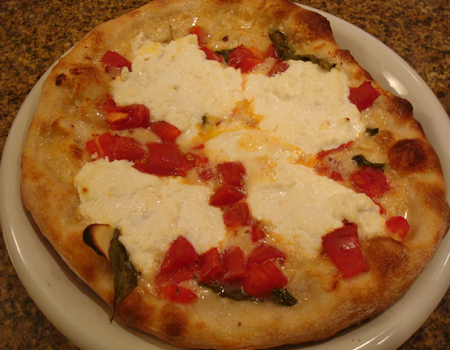
I couldn’t resist documenting in photos my first attempt at this dough recipe. The pizza bianco with its green olives, mozzarella, and garlic is salty, and dreamy-creamy. The pomodoro with ricotta really lets the sweet-tang of the tomatoes shine through.
I’ll definitely be making this dough again. Yup, the dough that takes nearly three days to make. Take a deep breath and go for it.
Piece of pie.

Neapolitan-Style Pizza
(Makes four 9- to 10-inch pizzas)
For the dough:
1/4 teaspoon active dry yeast
1 1/2 cups warm water (100 to 105 degrees)
2 teaspoons extra virgin olive oil
2 teaspoons salt
4 cups 00 flour or all-purpose flour
Toppings of choice (recipes follow)
Extra virgin olive oil
To make the dough, in a small bowl, sprinkle the yeast over the warm water and let proof for 10 minutes. If the yeast has not dissolved into a soft, frothy paste in that time, hunt down a fresher batch and repeat the process. Stir in the olive oil and salt.
In the bowl of a stand mixer fitted with the dough hook, combine the flour and yeast mixture and mix together on low speed for about 2 minutes, or until the dough is shaggy and most of the water has been absorbed. Knead on medium-low speed for about 10 minutes, or until the dough pulls away from the sides of the bowl and looks smoother. Cover the bowl with a damp kitchen towel and let rest for 5 minutes. Knead on medium-low speed for an additional 10 minutes, or until the dough is very smooth, soft, and warm to the touch.
Lightly coat a large bowl with olive oil. Transfer the dough to the bowl, turn the dough so that both sides are lightly coated in oil, cover with plastic wrap, and refrigerate overnight.
The next day, punch down the dough with your fist, then fold over the sides and turn the dough over in the bowl. Re-cover and return to the refrigerator for at least 4 hours or up to 24 hours.
Remove the dough from the refrigerator and place it on a floured work surface. Divide the dough into 4 equal pieces. One at a time, cup the pieces in your hands and tuck under the sides until you have formed a smooth ball. Place the balls on the floured work surface, providing plenty of room between the balls, and cover with a damp kitchen towel. Let the balls proof for 1 1/2 to 2 hours, or until doubled in volume. Keep a water-filled spray bottle handy, and if you see a skin forming on the surface of the dough, spray the surface to dissolve the skin. The skin will prevent the dough from rising properly and will make shaping the dough difficult.
To make your oven pizza ready, place a pizza stone on the lowest rack and preheat the oven to its maximum temperature (typically between 500 to and 550 degrees) for at least 30 minutes.
To shape a ball of dough into a pizza base, place it on a well-floured work surface. Using the tips of your fingers, pat down the ball, flattening it into a disk. Place the palm of one hand in the center of the dough and gently but firmly press down. At the same time, with the other hand, pull the dough outward while rotating it clockwise to form a flat circle with a slightly raised edge, or cornicione. If the dough feels resistant as you stretch it, set it aside, covered with a damp kitchen towel, while you work on a second ball of dough. This will give the gluten a chance to rest, making the dough more pliable once you return to it. The entire time you are working on the dough, maintain a thin layer of flour underneath it to prevent it from sticking. If you don’t feel confident handling pizza dough, try starting with a rolling pin to ensure you begin with an even circle, and then return to hand stretching. Continue to stretch the dough, allowing time for it to relax as needed, until it is 10 to 12 inches in diameter.
Generously dust a pizza peel or a rimless baking sheet with flour. Slide the pizza base onto the peel, and then immediately shake the peel to ensure the dough isn’t sticking to it. Dress the base with the selected toppings. To transfer the pizza to the pizza stone, place the peel over the stone and quickly jerk it back. The pizza should slide smoothly off the peel onto the stone in one piece. It is important to bake the pizza immediately after putting the toppings on it, or the dough will soften and stick to the peel. If you are grilling the pizza, follow the instructions below, making sure not to add any of the toppings until the base has been brushed with olive oil, grilled on the first side, and flipped over.
Bake the pizza for 6 to 7 minutes, or until the dough is crisp and golden brown and the top is bubbling. Take care not to open the oven door often to maintain the high oven temperature. Using the peel or baking sheet, remove the pizza from the oven, drizzle with olive oil, and cut into 4 pieces with a knife or pizza cutter. Serve at once. Repeat with the remaining 3 balls.
Pizza Bianco
(Makes one 9- to 10-inch pizza)
1/2 cup coarsely grated grana
1 Neapolitan-style pizza base
5 fresh basil leaves
5 to 10 green olives, pitted
Pinch of dried chile flakes
1/2 clove garlic
3 ounces fresh mozzarella, cut into 1/4-inch-thick disks
Evenly scatter the grana over the surface of the pizza base, followed by the basil leaves, olives, and chile flakes. With a sharp paring knife or a mandoline, slice the garlic into paper-thin slices and distribute them evenly over the pizza. Judiciously distribute the mozzarella over the top. Bake as directed.
Pizza Pomodoro with Ricotta
(Makes one 9- to 10-inch pizza)
1 beefsteak tomato (about 4 ounces)
Kosher salt
1/2 cup fresh ricotta, drained if necessary
1/2 cup coarsely grated grana
1 Neapolitan-style pizza base
1 clove garlic
1/2 teaspoon dried chile flakes
5 fresh basil leaves
Core the tomato, cut into 1/4-inch chunks, and place in a small bowl. Sprinkle with salt to taste, toss gently, and set aside at room temperature for at least 30 minutes or up to 2 hours. Place the ricotta in a separate small bowl, add 1/2 teaspoon salt, or to taste, and mix well.
Evenly scatter the grana over the surface of the pizza base. With a sharp paring knife or a mandoline, slice the garlic into paper-thin slices and distribute them evenly over the pizza. Sprinkle with the chile flakes and basil leaves, and judiciously distribute the tomato and ricotta over the top. Bake as directed.
Recipes from “A16: Food + Wine” by Nate Appleman, Shelly Lindgren and Kate Leahy

We usually get our pizza doughs from Trader Joes and make the pizzas that night. If we left it in the fridge for 3 days, do you think it would get a deeper flavor?
Wow, that looks really good. Did you just bake that in your oven? And does the recipe make a lot of dough or will it be a smalle enough portion for a single guy?
Very nice recipes. It’s really similar to how I make it, but I use ice-cold water before refrigerating and a smaller amount of yeast.
Hoping to find doppio zero flour around here but no luck so far.
This book is on my short list, and I can’t wait to read it. Your pizzas look fantastic.
Jude, if you find that flour locally, let me know. I haven’t made an exhaustive search yet, but I’m thinking it will take a little poking around to find it.
Singe Guy, yes, I baked those pizzas in my oven, but using a pizza stone. A pizza stone really helps to give it a very crisp crust because it absorbs and retains heat so well.
In answer to your question and to Nate’s: The recipe makes enough for four individual pizzas. If you read my review on the ProjectFoodie link, you’ll see that I made two pizzas one night, then froze the other two dough balls for another time. I don’t recommend leaving that dough or the Trader Joe’s in the fridge for too long because it may start to ferment too much. I know my friend Kiki has made pizza dough often from scratch. When she has left her dough in the fridge for a couple days as she’s tried to use it up, the dough has risen A LOT, and gotten quite bubbly in texture. But of course, a lot depends on how much yeast is in the dough. With the A16 recipe, because it has a tiny amount of yeast, you probably can leave it in the fridge another day or two beyond the three called for. I’m not sure how much yeast is in the Trader Joe’s dough, so it’s hard to tell what may or may not happen if you leave it in the fridge for a longer time. Nate, you could always experiment and blog about what happens.
That looks out of this world-fantastic! Gonna have to try this out. Thanks so much!
Nice looking pizzas!
wow. wow you are my career role model! after reading your profile–you have written for so many amazing things it’s, well amazing. i want to be a food writer, immensely or work in publishing. people always tell me, oh you’re too specific, and what’s a food writer anyways?–i’m in my final year of undergraduate study, unfortunately not journalism though, history and french. but eh maybe someday i’ll work at Gourmet too. any…career advice? anyways…pretty pizza
I guess pizza dough is like poi – tastes better after sitting around for a bit!
I recently made the pizza dough from Cooks illustrated that has a lot of liquid in it, and let it sit overnight in the fridge. Really good. The second time I only let it sit out on my counter for about 8 hrs and it wasn’t nearly as delicious. Same texture, but totally different flavor. Amazing what a little patience will do for bread dough! I’ll definitely have to try this recipe and compare.
I see that the a16 and the Cooks Illustrated recipes both use all purpose flour. I would have thought that bread flour would be in order here for a chewier, more elastic dough? And could you talk a bit about this magical “00” flour please? Y’mean there’s something even more amazing than King Arthur?
Mallory, you don’t necessarily have to study journalism to write about food. I did. But many others did not. Some have gone on to food writing after having worked in restaurants or graduating from culinary school. You definitely need writing skills, and knowledge of food. But studying other topics can strengthen your writing, and knowledge of food can come from your own personal experience and curiosity. I didn’t go to cooking school, but I’ve always loved to cook and bake. I think if you work hard, persevere, and follow your dreams, you can do anything you set your mind to.
Wow! We were planning to (finally) try the dough next weekend. Now that I’ve seen your photos, I am not sure I can wait that long. Since your original Twitter on your experiment, I keep getting forgetting to give enough time to make this recipe (the W. Puck one we use – which is great – takes just a few minutes to prepare and then maybe 2-3 hours to rise). So thanks for posting this. I suspect the ricotta tomato will be a family favorite.
Indeed, there is other awesome flour besides King Arthur, Rena.
According to the A16 cookbook, “00” (doppio zero) flour gets its name from the grade of flour. It is considered the finest milled flour. A16 gets its doppio zero imported from Antimo Caputo, a family-run mill in Naples since 1925. (Heavens, no wonder A16’s pizzas taste so good!).
The book states that “00” flour feels nearly as fine as pastry flour. It is higher in protein than mosts all-purpose flours…It is essential for springy pizza dough and strong pasta dough.”
The book doesn’t recommend using domestic “00” flours for pizzas or pastas, because they tend to be lower in protein than imported ones. The book says to use all-purpose flour if you cannot find good “00” flour. (And that is what I used when I made the pizza dough.)
Here are some sources listed in the book for “00” flour:
http://www.fornobravo.com
http://www.luccadell.com (Lucca Delicatessen in San Francisco)
http://www.penmac.com
aHA! Thanks for the info. I’m going to make the dough tonight so it’s ready by the end of the week. Maaaan, I need a second fridge!
I love the A16 cookbook (and restaurant)! It is one of my goals to cook every recipe in it. This is the last one I made and it was delicious:
http://mslistologist.com/?m=200911
Pingback: Food Gal » Blog Archiv » San Francisco’s A16 Still Going Strong
Pingback: Food Gal » Blog Archiv » Delfina’s Perfect Pizza Dough Recipe and A Great Pizza Stone
Something is wrong. In the morning I tried to punch it down and it was like trying to punch a brick
Eric: This is not a very puffy dough, given that there’s not much yeast in it. However, it should still feel soft. Does your fridge run extremely cold? That may make the dough stiffen up. I know I’ve run into that issue before because my fridge, especially on the bottom shelf, can be super cold.
Is this a really sticky dough? I hesitate to add more flour, but it’s quite sticky… I’m just to the point where I’m getting ready to put it in the fridge. TIA
Gigi: I wouldn’t say that it’s super sticky. If you followed the measurements, it should produce a soft, pliable dough that’s will stick a little to your fingers, but not so much that it’s hard to work with. Also, when it rests in the fridge, it will dry out a little more. Let me know how it goes. It should work just fine. Happy baking!